
In the fast-paced world of cryptocurrencies, staying updated with real-time market data is crucial for investors, traders, and enthusiasts. A well-designed and functional crypto dashboard can provide a centralized hub for monitoring various aspects of the cryptocurrency market. In this article, we will explore the process of creating a comprehensive crypto dashboard using Vue.js, a popular JavaScript framework for building user interfaces.
Introduction to Vue.js
Vue.js is a progressive JavaScript framework that is widely used for building user interfaces. Its simplicity and flexibility make it an excellent choice for developing single-page applications. Vue.js follows a component-based architecture, allowing developers to create reusable and modular components, making it an ideal choice for our crypto dashboard project.
Setting Up the Project
To get started, make sure you have Node.js and npm (Node Package Manager) installed on your system. Create a new Vue.js project using the Vue CLI (Command Line Interface):
vue create crypto-dashboard
Navigate to the project folder:
cd crypto-dashboard
Install additional dependencies for our project, such as Axios for making HTTP requests and Vuex for state management:
npm install axios vuex --save
Designing the Dashboard Layout
The foundation of any effective dashboard lies in its layout. Vue.js allows us to create a modular structure using components. Design the layout with components such as Header, Sidebar, Market Overview, and Portfolio Tracker.
<!-- App.vue -->
<template>
  <div id="app">
    <Header />
    <div class="main-container">
      <Sidebar />
      <div class="content-container">
        <MarketOverview />
        <PortfolioTracker />
      </div>
    </div>
  </div>
</template>

<script>
import Header from './components/Header.vue';
import Sidebar from './components/Sidebar.vue';
import MarketOverview from './components/MarketOverview.vue';
import PortfolioTracker from './components/PortfolioTracker.vue';

export default {
  components: {
    Header,
    Sidebar,
    MarketOverview,
    PortfolioTracker,
  },
};
</script>

<style>
/* Add your global styles here */
</style>
Fetching Real-Time Data
To populate our dashboard with real-time data, we can use the CoinGecko API, a popular cryptocurrency data provider. Use Axios to make API requests within the components. Create a Vuex store to manage the application state and handle data flow between components.
// store/index.js
import Vue from 'vue';
import Vuex from 'vuex';

Vue.use(Vuex);

export default new Vuex.Store({
  state: {
    marketData: [],
    portfolio: [],
  },
  mutations: {
    setMarketData(state, data) {
      state.marketData = data;
    },
    setPortfolio(state, data) {
      state.portfolio = data;
    },
  },
  actions: {
    async fetchMarketData({ commit }) {
      // Make API request and commit data mutation
    },
    async fetchPortfolio({ commit }) {
      // Make API request and commit data mutation
    },
  },
});
Displaying Data in Components
Utilize the fetched data in the components to dynamically display market information and portfolio details. Use charts, tables, and other UI elements to present the data in an organized and visually appealing manner.
<!-- MarketOverview.vue -->
<template>
  <div class="market-overview">
    <h2>Market Overview</h2>
    <div v-for="coin in marketData" :key="coin.id">
      <!-- Display market data -->
    </div>
  </div>
</template>

<script>
export default {
  data() {
    return {
      marketData: [],
    };
  },
  mounted() {
    this.$store.dispatch('fetchMarketData');
  },
};
</script>

<style scoped>
/* Component-specific styles here */
</style>
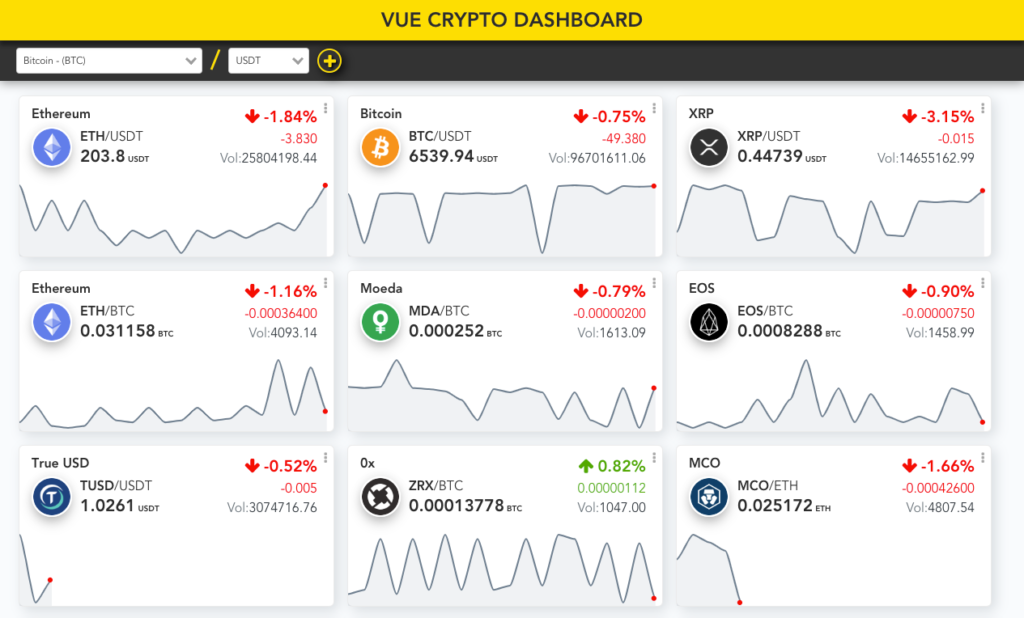
This Cryptocurrency Dashboard has been builded with Vue JS, PWA enabled, Binance Websocket API for realtime price, amChart for displaying historical charts, SVG Sparkline Chart and Latest News feed from Cryptocompare site
Prerequisites:
- Node/NPM
- Vue-cli 3.x
Project setup
npm install
Compiles and hot-reloads for development
npm run serve
Compiles and minifies for production
npm run build
Lints and fixes files
npm run lint
Run your unit tests
npm run test:unit